Source URL: https://www.codegrepper.com/code-examples/javascript/trim+text+using+pipes+angular
trim text using pipes angular
{{ (str.length>6)? (str | slice:0:6)+'..':(str) }}
If you can't do
UPDATE table SET a=value WHERE x IN
    (SELECT x FROM table WHERE condition);
because it is the same table, you can trick and do :
UPDATE table SET a=value WHERE x IN
    (SELECT * FROM (SELECT x FROM table WHERE condition) as t)
[update or delete or whatever]
Because you set the binding to ID: bindValue="ID". Remove it and it should work.
Read more about bindings here: https://ng-select.github.io/ng-select#/bindings
It is possible to display it via a custom label and item template:
<ng-select [items]="users" bindLabel="firstName">

  <ng-template ng-label-tmp let-item="item">
      <span >{{ item.firstName + ' ' + item.lastName }}</span>
  </ng-template>
  <ng-template ng-option-tmp let-item="item" let-search="searchTerm" let-index="index">
        <span >{{ item.firstName + ' ' + item.lastName }}</span>
  </ng-template>

</ng-select>
Displaying values with interpolationInterpolation refers to embedding expressions into marked up text. By default, interpolation uses the double curly braces {{ and }} as delimiters.
<span >{{item? item.firstName + ' ' + item.lastName:'' }}</span>
You can use nested ternary if
{{element.source == 1 ? 'upwork' : (element.source == 2 ? 'refer from friend' : '')}}
or probably better
export class MyComponent {
  sourceNames = {1: 'upwork', 2: 'refer from friend', 3: 'other' };
}
{{sourceNames[element.source]}}
ng-select only accepts a string value in the attribute. I may be misunderstanding but I believe that if you say bindLabel="firstName+lastName", ng-select is attempting to reference item[firstNamelastName] which does not exist.
I think your best option is to transform the collection. You can add a .map to the end of your array declaration and use bindLabel="fullName" in your template:
[
  {firstName: "John", lastName: "Doe"},
  {firstName: "Jane", lastName: "Doe"}
].map((i) => { i.fullName = i.firstName + ' ' + i.lastName; return i; });
Imagine having a tool that can automatically detect JPA and Hibernate performance issues. Hypersistence Optimizer is that tool!
While answering questions on the Hibernate forum, I stumbled on the following question about using the @ManyToOne annotation when the Foreign Key column on the client side references a non-Primary Key column on the parent side.
In this article, you are going to see how to use the @JoinColumn annotation in order to accommodate non-Primary Key many-to-one associations.
Assuming we have the following tables in our database:
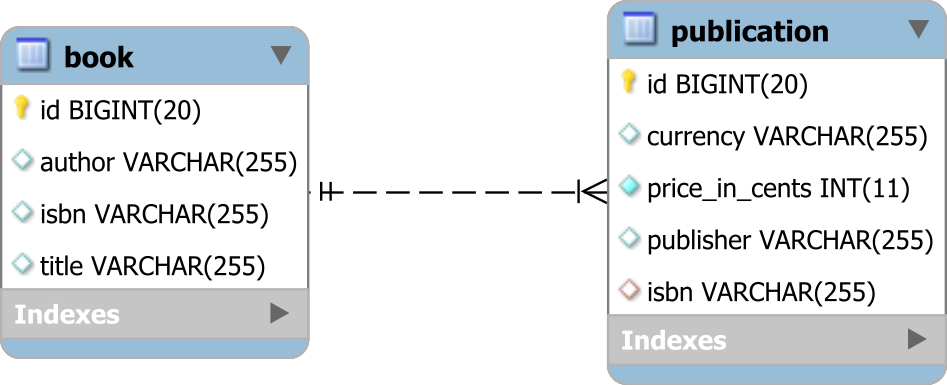
The isbn column on the publication and book tables are linked via a Foreign Key constraint which is the base of our @ManyToOne assocation:
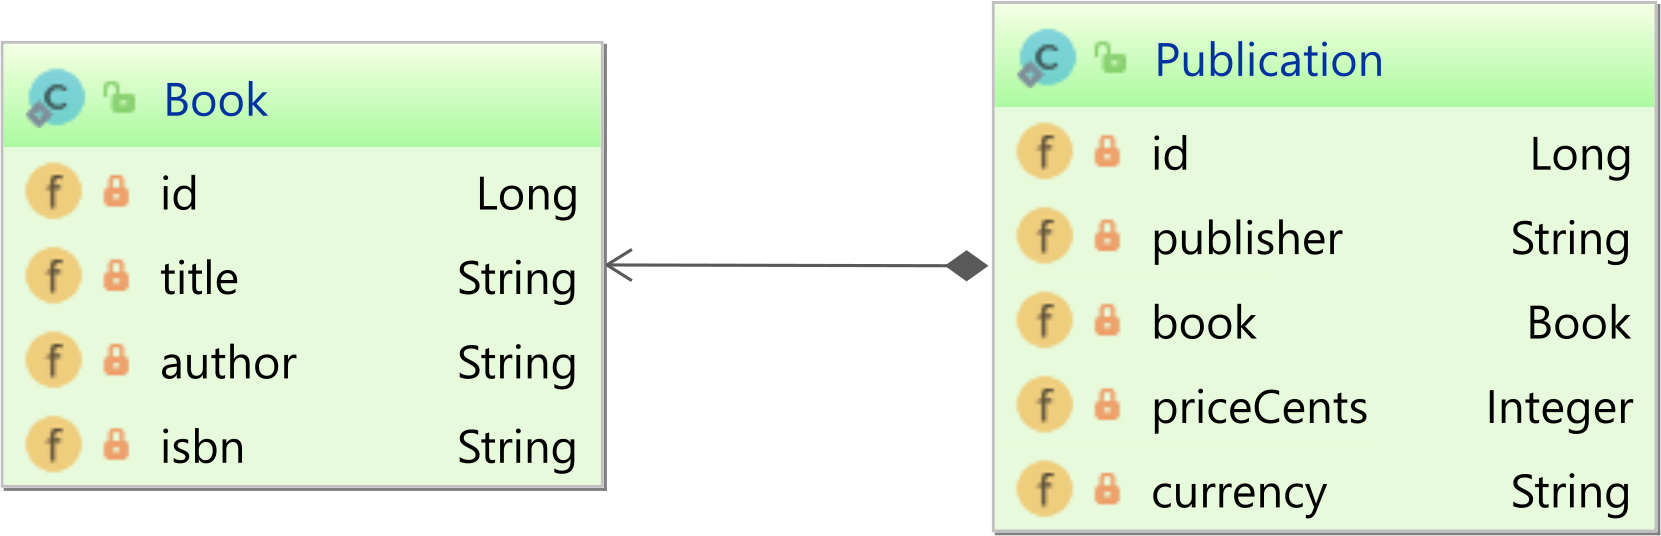
The Book represents the parent side of the association, and it’s mapped as follows:
1 2 3 4 5 6 7 8 9 10 11 12 13 14 15 16 17 18 | @Entity(name = "Book")@Table(name = "book")public class Book implements Serializable { @Id @GeneratedValue private Long id; private String title; private String author; @NaturalId private String isbn; //Getters and setters omitted for brevity} |
The isbn column is mapped as a @NaturalId since it can be used as a business key as well.
For more details about the
@NaturalIdannotation, check out this article.
The Publication represents the child of the association, so it’s going to be mapped like this:
1 2 3 4 5 6 7 8 9 10 11 12 13 14 15 16 17 18 19 20 21 22 23 24 25 26 27 | @Entity(name = "Publication")@Table(name = "publication")public class Publication { @Id @GeneratedValue private Long id; private String publisher; @ManyToOne(fetch = FetchType.LAZY) @JoinColumn( name = "isbn", referencedColumnName = "isbn" ) private Book book; @Column( name = "price_in_cents", nullable = false ) private Integer priceCents; private String currency; //Getters and setters omitted for brevity} |
By default, the @ManyToOne association assumes that the parent-side entity identifier is to be used to join with the client-side entity Foreign Key column.
However, when using a non-Primary Key association, the referencedColumnName should be used to instruct Hibernate which column should be used on the parent side to establish the many-to-one database relationship.
Assuming we have the following entities in our database:
1 2 3 4 5 6 7 8 9 10 11 12 13 14 15 16 17 18 19 | Book book = new Book();book.setTitle( "High-Performance Java Persistence" );book.setAuthor( "Vlad Mihalcea" );book.setIsbn( "978-9730228236" );entityManager.persist(book);Publication amazonUs = new Publication();amazonUs.setPublisher( "amazon.com" );amazonUs.setBook( book );amazonUs.setPriceCents( 4599 );amazonUs.setCurrency( "$" );entityManager.persist( amazonUs );Publication amazonUk = new Publication();amazonUk.setPublisher( "amazon.co.uk" );amazonUk.setBook( book );amazonUk.setPriceCents( 3545 );amazonUk.setCurrency( "&" );entityManager.persist( amazonUk ); |
Upon fetching the Publication along with its associated Book, we can see that the @ManyToOne association works as expected:
1 2 3 4 5 6 7 8 9 10 11 12 13 14 15 16 17 18 19 20 | Publication publication = entityManager.createQuery( "select p " + "from Publication p " + "join fetch p.book b " + "where " + " b.isbn = :isbn and " + " p.currency = :currency", Publication.class).setParameter( "isbn", "978-9730228236" ).setParameter( "currency", "&" ).getSingleResult();assertEquals( "amazon.co.uk", publication.getPublisher());assertEquals( "High-Performance Java Persistence", publication.getBook().getTitle()); |
When executing the JPQL query above, Hibernate generates the following SQL statement:
1 2 3 4 5 6 7 8 9 10 11 12 | SELECT p.id AS id1_1_0_, b.id AS id1_0_1_, p.isbn AS isbn5_1_0_, p.currency AS currency2_1_0_, p.price_in_cents AS price_in3_1_0_, p.publisher AS publishe4_1_0_, b.author AS author2_0_1_, b.isbn AS isbn3_0_1_, b.title AS title4_0_1_FROM publication pINNER JOIN book b ON p.isbn = b.isbnWHERE b.isbn = '978-9730228236' AND p.currency = '&' |
As you can see, the referencedColumnName allows you to customize the JOIN ON clause so that the isbn column is used instead of the default entity identifier.

