2021-10-21

Eclipse 2021-09 unable install Subversive - SVN Team Provider 4.0.5


"The following solutions are not available: Subversive - SVN Team provider 4.0.5"


Version: 2021-09

The following solutions are not available: Subversive - SVN Team Provider 4.0.5 (id=org.eclipse.team.svn.resource.ignore.rules.jdt.feature.group, site=http://download.eclipse.org/technology/subversive/4.0/update-site/)


Version: 2021-06

The following solutions are not available: Subversive - SVN Team Provider 4.0.5 (id=org.eclipse.team.svn.resource.ignore.rules.jdt.feature.group, site=http://download.eclipse.org/technology/subversive/4.0/update-site/)


but URL still reachable via browser: http://download.eclipse.org/technology/subversive/4.0/update-site/


So I manual add to install with Eclipse@202109.


For later versions: 


Archived: How to clear the 'SoftwareDistribution' folder on Windows 10 and make updates happen again


WINDOWS 10 ADVANCED
How to clear the 'SoftwareDistribution' folder on Windows 10 and make updates happen again
If Windows Update isn't working, it could be caused by a problem with the SoftwareDistribution folder, and here we'll show you how to fix it.
MAURO HUCULAK
16 Mar 2017


On Windows 10, the "SoftwareDistribution" folder is an essential component for Windows Update, which temporarily stores files needed to install new updates to keep your device secure and with the latest fixes and improvements.

This folder is maintained by the WUAgent (Windows Update Agent), and typically, it should be left alone, but there will be times when you may need to clear its content manually in the case the Datastore and Download folders aren't synchronized, and it's preventing Windows Update from applying new updates to your PC.

Usually, if you're having trouble with Windows Update, or after updates have been applied, it's safe to empty the content of the SoftwareDistribution folder. Windows 10 will always re-download all the necessary files, or re-create the folder and re-download all the components, if removed.


In this Windows 10 guide, we'll walk you through the steps to delete the content inside the SoftwareDistribution folder. As an alternative option, we'll also show you the steps to rename the folder, in case you only want to test if the folder's content is the one causing problems.

How to clear the 'SoftwareDistribution' folder

To delete the content inside the SoftwareDistribution folder, do the following:

  1. Open Start.
  2. Search for Command Prompt, right-click the result, and select Run as administrator.
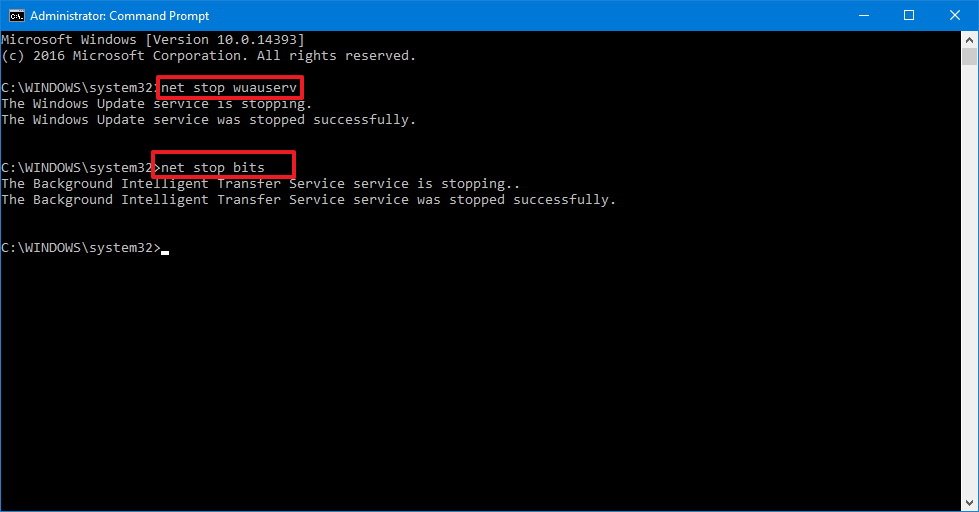
  3. Type the following command to stop the Windows Update Service and press Enter:

    net stop wuauserv

  4. Type the following command to stop the Background Intelligent Transfer Service and press Enter:

    net stop bits

  5. Use the Windows key + R keyboard shortcut to open the Run command.
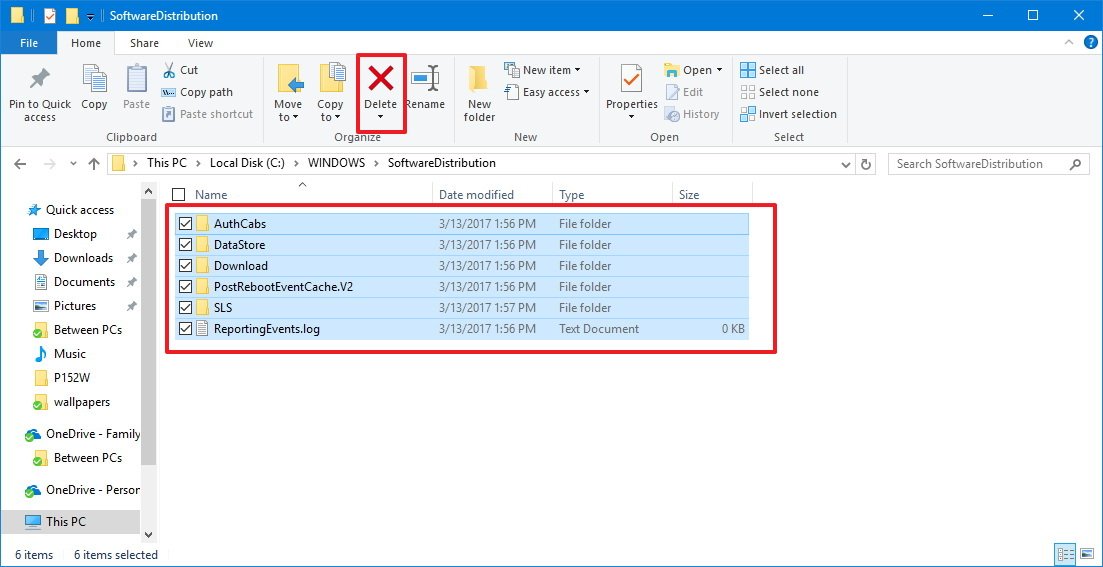
  6. Open File Explorer and browse the following path:

    C:\Windows\SoftwareDistribution

  7. Select all its content and click the Delete button to clear the content.

    Quick Tip: In the case, you're having trouble deleting all the files, simply restart your computer, and try again.

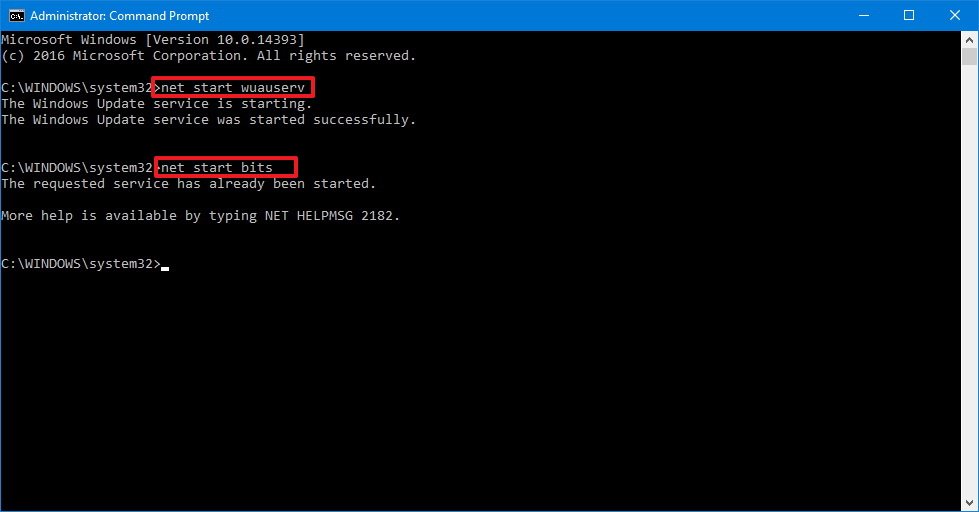
  8. On Command Prompt, type the following command to start the Windows Update Service and press Enter:

    net start wuauserv

  9. Type the following command to start the Background Intelligent Transfer Service and press Enter:

    net start bits

Once you completed the steps, Windows 10 will reconfigure the folder and re-download all the necessary components.

How to rename the 'SoftwareDistribution' folder

If you don't want to delete the content inside of the folder, you can alternatively, rename the folder to troubleshoot Windows Update problems.

To rename the SoftwareDistribution folder, do the following:

  1. Open Start.
  2. Search for Command Prompt, right-click the result, and select Run as administrator.
  3. Type the following command to stop the Windows Update Service and press Enter:

    net stop wuauserv

  4. Type the following command to stop the Background Intelligent Transfer Service and press Enter:

    net stop bits

  5. Use the Windows key + R keyboard shortcut to open the Run command.
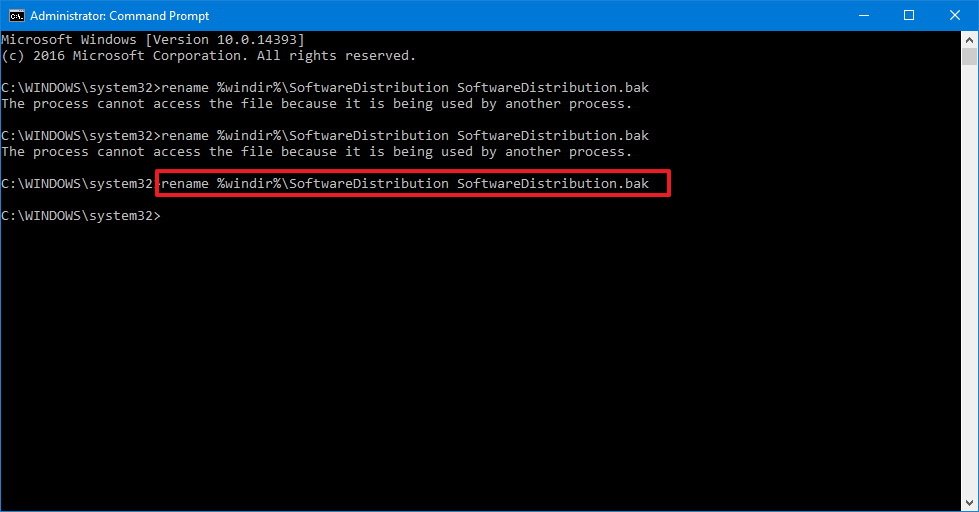
  6. Type the following command to rename the folder and press Enter:

    rename %windir%\SoftwareDistribution SoftwareDistribution.bak

    Quick Tip: If the command isn't letting you rename the folder, try steps No. 3 and 4 one more time, and then try to rename the folder.

  7. Type the following command to start the Windows Update Service and press Enter:

    net start wuauserv

  8. Type the following command to start the Background Intelligent Transfer Service and press Enter:

    net start bits

After you've completed the steps, Windows 10 will re-create the folder and re-download all the necessary components.

The only caveat with this process is that the SoftwareDistribution folder also includes the Windows Update history information, which means that emptying up the folder will result in loss of this data. In addition, you'll notice that Windows Update will take longer than usual to detect and update your computer because the WUAgent must check and re-create the Datastore information. However, it's a small price to pay to get your device to update again.

While sometimes the folder may grow, it's only recommended to use these instructions only when necessary. You shouldn't mess with the SoftwareDistribution folder to free up storage space on your computer.


Upgrade nvm v1.1.7 to v1.1.8


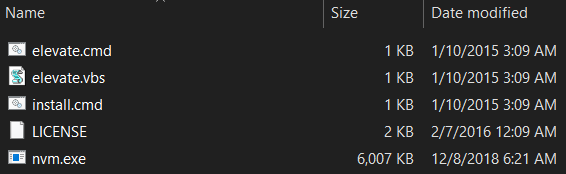
Old files of version 1.1.7:


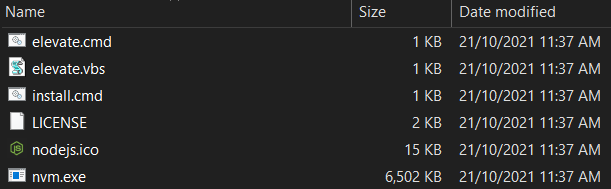
After run nvm-update.exe, it will prompt you which version to upgrade, and download files:


2021-09-25

Archived: Windows XP Pro won't boot, safe mode boot hangs at agp440.sys


If you see hard drive activity while the PC APPEARS to be stuck on agp440.sys, this is a GOOD thing since it means Windows XP is conducting chkdsk in the background. Let it finish, even if it takes all night. Just check it in the morning.

If that is not the issue, you will need to create your own bootable Windows XP Recovery Console CD, configure your PC's BIOS to boot from it, then actually boot from it, and then run the chkdsk command with the /r switch. Complete instructions may be found in ElderL's post from this thread:


For simplicity, here they are:

Power failures are notorious for corrupting your NT File System (NTFS), so you need to boot into the XP Recovery Console and run chkdsk  /r  until it reports no errors (that may take more than one pass).  You are on the right track though.

If after burning your CD as indicated below, you do NOT see the message:

Press any key to boot from CD...

Then you need to get into the BIOS in your system of unspecified make and model and adjust the device boot order to put the CD Drive as the first boot device.

If you see the same missing or corrupt message instead something is not right and you need to look at things more closely.  Sometimes there is an option on the screen when the system reboots to press a key to select a boot device (mine is F11) and then you can just choose the CD/DVD drive as the boot device.

If anybody wants to recreate these sorts of problems for practice, just pull the plug on your running XP system 4 or 5 times and you will all the message we know and love.


Here are my standard suggestions:

You can make a bootable Recovery Console CD by downloading an ISO file and burning it to a CD.

The bootable ISO image file you need to download is called:

xp_rec_con.iso 

Download the ISO file from here:

http://www.mediafire.com/?ueyyzfymmig

Use a new CD and this free and easy program to burn your ISO file and create your bootable CD:

http://www.imgburn.com/

When installing ImgBurn, DO NOT install the Ask toolbar.

Here are some instructions for ImgBurn:

http://forum.imgburn.com/index.php?showtopic=61

It would be a good idea to test your bootable CD on a computer that is working.

You may need to adjust the computer BIOS settings to use the CD ROM drive as the first boot device instead of the hard disk.  These adjustments are made before Windows tries to load.  If you miss it, you will have to reboot the system again.

When you boot on the CD, follow the prompts:

Press any key to boot from CD...

The Windows Setup... will proceed.

Press 'R' to enter the Recovery Console.

Select the installation you want to access (usually  1: C:\WINDOWS)

You may be asked to enter the Administrator password (usually empty).

You should be in the C:\WINDOWS folder.  This is the same as the 

C:\WINDOWS folder you see in explorer.

The Recovery Console allows basic file commands like: copy, rename, replace, delete, cd, chkdsk, fixboot, fixmbr, etc.

For a list of Recovery Console commands, enter help at the prompt or read about the XP Recovery Console here:

http://www.microsoft.com/resources/documentation/windows/xp/all/proddocs/en-us/recovery_console_cmds.mspx?mfr=true

A good idea before starting things is to first verify the integrity of your file system using the chkdsk command.

From the command prompt window run the chkdsk command on the drive where Windows is installed to try to repair any problems on the afflicted drive.

Running chkdsk is fine even if it doesn't find any problems.  It will not hurt anything to run it.

Assuming your boot drive is C, run the following command:

chkdsk C: /r

Let chkdsk finish and correct any problems it might find.  

It may take a long time for chkdsk to complete or it may appear to be 'stuck'.  Be patient.  If the HDD light is still flashing, chkdsk is doing something.  Keep an eye on the percentage amount to be sure it is still making progress.  It may even appear to go backwards sometimes.

You should run chkdsk /r again until it finds no errors to correct.

Remove the CD and type 'exit' to leave the RC and restart the computer.

You do not have to adjust the BIOS again to boot on the HDD since the CD will not be present.




2021-09-23

Unable update table where clause in same sub table.


https://stackoverflow.com/a/43610081


If you can't do

UPDATE table SET a=value WHERE x IN
    (SELECT x FROM table WHERE condition);

because it is the same table, you can trick and do :

UPDATE table SET a=value WHERE x IN
    (SELECT * FROM (SELECT x FROM table WHERE condition) as t)

[update or delete or whatever]


2021-09-10

Angular 8 ng-select value object


Because you set the binding to ID: bindValue="ID". Remove it and it should work.

Read more about bindings here: https://ng-select.github.io/ng-select#/bindings


Source URL: https://stackblitz.com/run?file=src%2Fbindings-default-example.component.ts


html

<ng-select [items]="defaultBindingsList"
           [(ngModel)]="selectedCity">
</ng-select>


ts
import { ComponentOnInit } from '@angular/core';

@Component({
    selector: 'bindings-default-example',
    templateUrl: './bindings-default-example.component.html',
    styleUrls: ['./bindings-default-example.component.scss']
})
export class BindingsDefaultExampleComponent implements OnInit {

    defaultBindingsList = [
        { value: 1label: 'Vilnius' },
        { value: 2label: 'Kaunas' },
        { value: 3label: 'Pavilnys'disabled: true }
    ];

    selectedCity = null;

    ngOnInit() {
        this.selectedCity = this.defaultBindingsList[0];
    }
}


Angular 8 bindLabel append values


Both has no issue to show appended "full name".

Eventually go for option#2, which loop through the list to custom the display label, as the ng-select filtering in options#1 won't search through item.lastName.


Option#1
Source URL: https://stackoverflow.com/a/56531503

It is possible to display it via a custom label and item template:

<ng-select [items]="users" bindLabel="firstName"> 

  <ng-template ng-label-tmp let-item="item">
      <span >{{ item.firstName + ' ' + item.lastName }}</span>
  </ng-template>
  <ng-template ng-option-tmp let-item="item" let-search="searchTerm" let-index="index">
        <span >{{ item.firstName + ' ' + item.lastName }}</span>
  </ng-template>

</ng-select>


Displaying values with interpolation
Interpolation refers to embedding expressions into marked up text. By default, interpolation uses the double curly braces {{ and }} as delimiters.


if using Option#1 u might need to check optional checking as below, in case u got undefined for both value to be appended.

<span >{{ item? item.firstName + ' ' + item.lastName:'' }}</span>


You can use nested ternary if

{{element.source == 1 ? 'upwork' : (element.source == 2 ? 'refer from friend' : '')}}

or probably better

export class MyComponent {
  sourceNames = {1: 'upwork', 2: 'refer from friend', 3: 'other' };
}
{{sourceNames[element.source]}}


Option#2

ng-select only accepts a string value in the attribute. I may be misunderstanding but I believe that if you say bindLabel="firstName+lastName", ng-select is attempting to reference item[firstNamelastName] which does not exist.

I think your best option is to transform the collection. You can add a .map to the end of your array declaration and use bindLabel="fullName" in your template:

[
  {firstName: "John", lastName: "Doe"},
  {firstName: "Jane", lastName: "Doe"}
].map((i) => { i.fullName = i.firstName + ' ' + i.lastName; return i; });


Google Referrals