Cortana in Windows as a standalone app is deprecated.
PS C:\WINDOWS\system32> Get-AppxPackage -allusers *PowerDirectorforDell*
Name : DB6EA5DB.PowerDirectorforDell
Publisher : CN=899678FE-321F-4A81-BE95-1802E9A98F2F
Architecture : X64
ResourceId :
Version : 15.0.4409.0
PackageFullName : DB6EA5DB.PowerDirectorforDell_15.0.4409.0_x64__mcezb6ze687jp
InstallLocation : C:\Program Files\WindowsApps\DB6EA5DB.PowerDirectorforDell_15.0.4409.0_x64__mcezb6ze687jp
IsFramework : False
PackageFamilyName : DB6EA5DB.PowerDirectorforDell_mcezb6ze687jp
PublisherId : mcezb6ze687jp
PackageUserInformation : {S-1-5-21-72608189-3911518983-1797934022-1027 [UserAbc]: Installed}
IsResourcePackage : False
IsBundle : False
IsDevelopmentMode : False
NonRemovable : False
IsPartiallyStaged : False
SignatureKind : Store
Status : Ok
And others:
Get-AppxPackage -allusers *PowerDirectorforDell* | Remove-AppxPackage -AllUsers
Get-AppxPackage -allusers *Bing* | Remove-AppxPackage -AllUsers
Get-AppxPackage -allusers *photo* | Remove-AppxPackage -AllUsers
Get-AppxPackage -allusers *phone* | Remove-AppxPackage -AllUsers
Get-AppxPackage -allusers *skype* | Remove-AppxPackage -AllUsers


Reference URL: https://www.tenforums.com/performance-maintenance/185009-how-clean-up-windowsapps-folder.html
Relevant URL: https://winbuzzer.com/2020/06/16/how-to-remove-windows-10s-built-in-apps-bloatware-and-and-restore-them-again-xcxwbt/
Failed to remove PowerDirectorforDell fromWindowsAppsPS C:\WINDOWS\system32> Get-AppxPackage -allusers *PowerDirectorforDell*Name : DB6EA5DB.PowerDirectorforDellPublisher : CN=899678FE-321F-4A81-BE95-1802E9A98F2FArchitecture : X64ResourceId :Version : 15.0.4409.0PackageFullName : DB6EA5DB.PowerDirectorforDell_15.0.4409.0_x64__mcezb6ze687jpInstallLocation : C:\Program Files\WindowsApps\DB6EA5DB.PowerDirectorforDell_15.0.4409.0_x64__mcezb6ze687jpIsFramework : FalsePackageFamilyName : DB6EA5DB.PowerDirectorforDell_mcezb6ze687jpPublisherId : mcezb6ze687jpPackageUserInformation : {S-1-5-21-72608189-3911518983-1797934022-1027 [keon]: Installed}IsResourcePackage : FalseIsBundle : FalseIsDevelopmentMode : FalseNonRemovable : FalseIsPartiallyStaged : FalseSignatureKind : StoreStatus : OkPS C:\WINDOWS\system32>PS C:\WINDOWS\system32>PS C:\WINDOWS\system32> Get-AppxPackage -allusers *PowerDirectorforDell* | Remove-AppxPackageRemove-AppxPackage : Deployment failed with HRESULT: 0x80073CF1, Package was not found.Windows cannot remove DB6EA5DB.PowerDirectorforDell_15.0.4409.0_x64__mcezb6ze687jp because the current user does not have that package installed. Use Get-AppxPackage to see the list of packages installed.NOTE: For additional information, look for [ActivityId] 5b5440af-88d0-0000-e4a0-565bd088d901 in the Event Log or use the command line Get-AppPackageLog -ActivityID 5b5440af-88d0-0000-e4a0-565bd088d901At line:1 char:52+ Get-AppxPackage -allusers *PowerDirectorforDell* | Remove-AppxPackage+ ~~~~~~~~~~~~~~~~~~+ CategoryInfo : ObjectNotFound: (DB6EA5DB.PowerD...__mcezb6ze687jp:String) [Remove-AppxPackage], PSInvalidOperationException+ FullyQualifiedErrorId : DeploymentError,Microsoft.Windows.Appx.PackageManager.Commands.RemoveAppxPackageCommand
Finally, 2024-03-23 1140pm+0800, I got it removed at: https://billson.blogspot.com/2024/03/finally-removed-powerdirectorfordell.html
In this Windows 10 guide, we'll walk you through the steps to delete the content inside the SoftwareDistribution folder. As an alternative option, we'll also show you the steps to rename the folder, in case you only want to test if the folder's content is the one causing problems.
To delete the content inside the SoftwareDistribution folder, do the following:
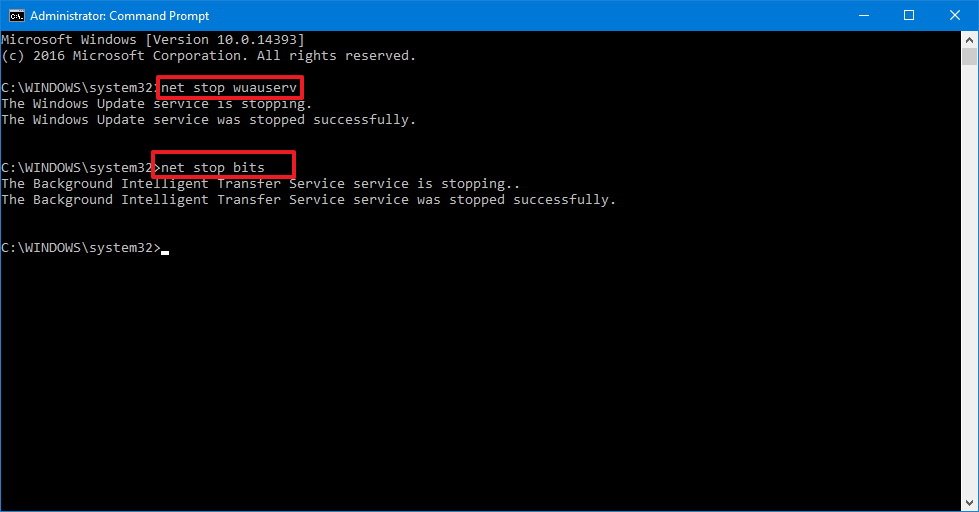
Type the following command to stop the Windows Update Service and press Enter:
net stop wuauserv
Type the following command to stop the Background Intelligent Transfer Service and press Enter:
net stop bits
Open File Explorer and browse the following path:
C:\Windows\SoftwareDistribution
Select all its content and click the Delete button to clear the content.
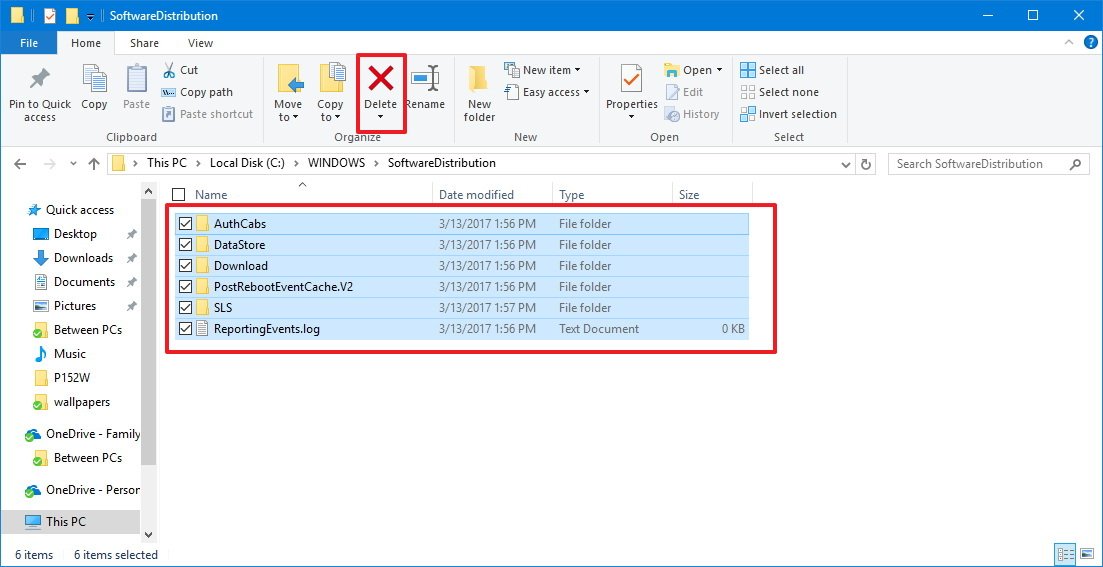
Quick Tip: In the case, you're having trouble deleting all the files, simply restart your computer, and try again.
On Command Prompt, type the following command to start the Windows Update Service and press Enter:
net start wuauserv
Type the following command to start the Background Intelligent Transfer Service and press Enter:
net start bits
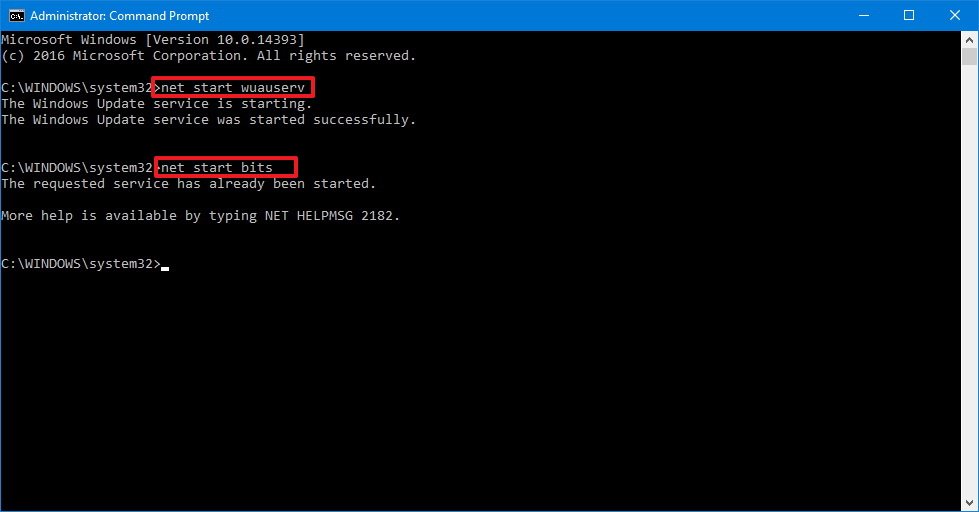
Once you completed the steps, Windows 10 will reconfigure the folder and re-download all the necessary components.
If you don't want to delete the content inside of the folder, you can alternatively, rename the folder to troubleshoot Windows Update problems.
To rename the SoftwareDistribution folder, do the following:
Type the following command to stop the Windows Update Service and press Enter:
net stop wuauserv
Type the following command to stop the Background Intelligent Transfer Service and press Enter:
net stop bits
Type the following command to rename the folder and press Enter:
rename %windir%\SoftwareDistribution SoftwareDistribution.bak
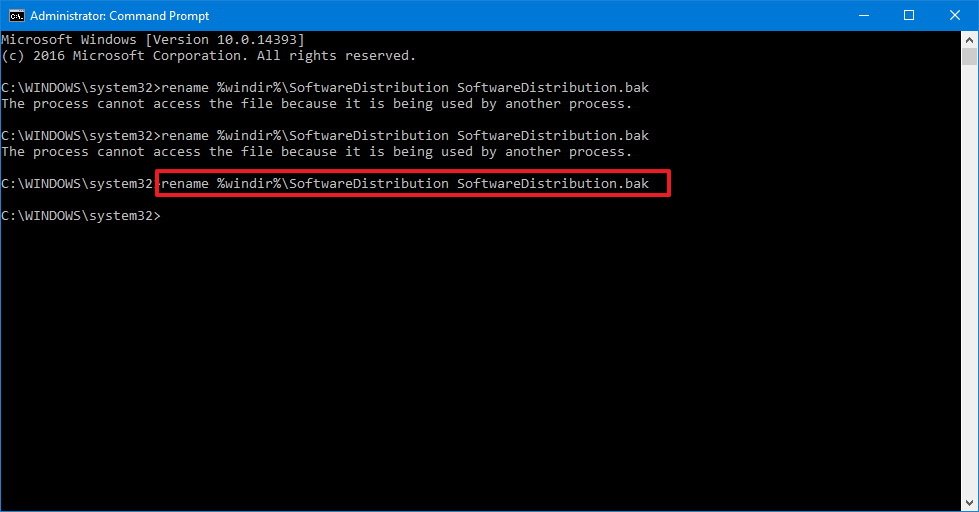
Quick Tip: If the command isn't letting you rename the folder, try steps No. 3 and 4 one more time, and then try to rename the folder.
Type the following command to start the Windows Update Service and press Enter:
net start wuauserv
Type the following command to start the Background Intelligent Transfer Service and press Enter:
net start bits
After you've completed the steps, Windows 10 will re-create the folder and re-download all the necessary components.
The only caveat with this process is that the SoftwareDistribution folder also includes the Windows Update history information, which means that emptying up the folder will result in loss of this data. In addition, you'll notice that Windows Update will take longer than usual to detect and update your computer because the WUAgent must check and re-create the Datastore information. However, it's a small price to pay to get your device to update again.
While sometimes the folder may grow, it's only recommended to use these instructions only when necessary. You shouldn't mess with the SoftwareDistribution folder to free up storage space on your computer.
Occasionally, your system may slow down to a crawl due to the PC-Doctor Module process that runs in the background. When this happens, it can take several seconds to open the Task Manager or any program.
The Task Manager may show that a process named PC-Doctor Module is occupying 100% of CPU and a very high amount of RAM. You may be wondering if PC-Doctor Module is a virus, Malware, or a PUA.
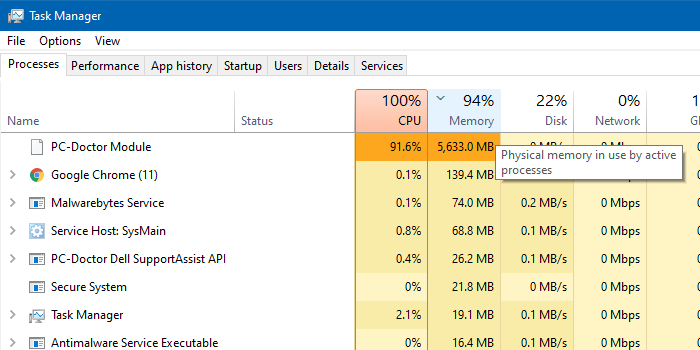
When you right-click on PC-Doctor Module and click Go to details to find the executable file name of the application, you’ll find that the executable file path looks like the following, and runs under NT AUTHORITY\SYSTEM (LocalSystem) account:
C:\Program Files\Dell\SupportAssistAgent\PCDr\SupportAssist\6.0.7193.611\pcdrmemory2.p5x" run -e -lang en -cust dell -var dsc -bd "C:\ProgramData\PCDr\7193" -engineClientPid
This happens in Dell computers that ship with the Dell SupportAssist diagnostics (a.k.a. Dell SupportAssist remediation services) utility.
PC-Doctor Module is a component of Dell SupportAssist. Dell SupportAssist keeps your PC up to date and running at its best with recommended software and driver updates. It also helps resolve issues quickly by detecting common problems and sending issue details to Dell Technical Support agents on your behalf.
The Dell SupportAssist tool periodically runs a hardware scan and optimization tasks. When it runs the hardware scan, the following components are analyzed:
It does a SMART Short Self Test, Linear Read test, Targeted Read test, CPU stress test, among other tests.
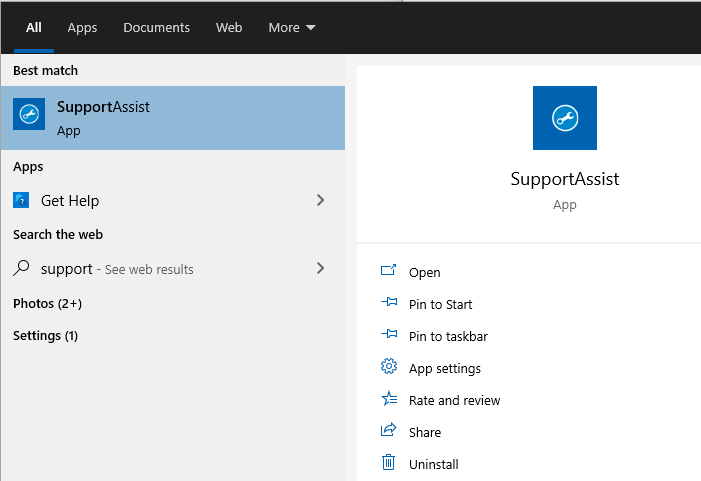
100% for a few minutes.You can open the SupportAssist tool from the Start menu.
The results of the previous hardware scans and optimization tasks would be available under the History tab of the Dell SupportAssist utility.

Click on the gear icon at the top right corner of the window, and click Settings.
By default, the Hardware scans are scheduled to run monthly once.

In the Settings page, you can disable the scheduled scans and optimizations by unchecking Turn on automatic scans and optimizations at: checkbox.
Alternatively, you can schedule a different time for the tasks to run. You may want to run the tasks after office hours so that you don’t face any performance bottlenecks when you’re working.
If you choose to disable the automatic scans, then you can manually run the scans at your preferred time or intervals via the Home tab.
Hardware scans can be extremely beneficial. You can make informed decisions from these scan results — e.g., it informs you in advance if a hardware component (i.e., the hard disk drive) is about to fail so that you can replace the necessary hardware proactively.
Googled: clear "$Recycle.Bin" in external hard drive
Found Source URL: https://superuser.com/a/564461
The $RECYCLE.BIN directory can be deleted from Windows command line rmdir /q /s C:\$RECYCLE.BIN as described in the first answer to this similar question, although as a system virtual folder care should be taken. Also, it will get recreated upon deletion of files from the drive containing it.


I managed to solve this myself by installing the "Generic Bluetooth adapter" driver.
Description
ProduKey is a small utility that displays the ProductID and the CD-Key of Microsoft Office (Microsoft Office 2003, Microsoft Office 2007), Windows (Including Windows 8/7/Vista), Exchange Server, and SQL Server installed on your computer. You can view this information for your current running operating system, or for another operating system/computer - by using command-line options. This utility can be useful if you lost the product key of your Windows/Office, and you want to reinstall it on your computer.
[HKEY_LOCAL_MACHINE\Software\Microsoft\Command Processor\Autorun]

if Autorun is not present, you can add a New String Value with the contents of @chcp 65001>nul – Dacto Oct 23 '18 at 20:45
chcp 65001


